Index
The hardware configuration setup for our SilverStone Fortress FT02 unit was based around Intel’s P55 platform and Nvidia’s GT200b chip design package from yesteryear. We used an EVGA P55 SLI FTW motherboard, an Intel Core i7 860 2.80GHz processor, 4GB of G.Skill RipJaws DDR3 1600MHz 7-7-7-24, an EVGA GeForce GTX 275 CO-OP PhysX Edition and an EVGA GeForce GTX 275 in SLI, and a single Seagate Barracuda 750GB 7200.11 SATA II hard drive.
In similarity to the Raven RV02, the Fortress FT02 supports large EATX motherboards up to 11-inches wide, including EVGA’s standard X58 SLI Classified models. However, it will not support the larger EVGA X58 4-way SLI Classified as it measures 13.58 inches wide, and will definitely not make room for the EVGA Classified SR-2 dual socket extra-large pizza that can’t seem to find a home anywhere it looks. While 13-inch EATX motherboards won’t fit, SilverStone notes that dual-socket SSI CEB motherboards will, as the motherboard tray has eight extra holes for boards that use bolt-through CPU coolers. It also conveniently features an access hole designed for the support plates of enthusiast-grade heatsinks.
From our experience, installing even a two-way SLI or CrossFireX configuration in this chassis is a very tight fit. Installation of the first card in PCI-E Bracket 1 is a breeze, but issues may arise when installing a second card because the 5.25-inch drive bay clearance on the Fortress FT02 is only 7.5-inches deep. At this depth, many standard Molex and SATA power connectors may come into direct contact with the heatsink of the second GPU and may prevent any DVD drives or 5.25-inch accessories from being completely inserted into their drive bays. For those GPU enthusiasts wishing to install 3-way or 2-way SLI / CrossFireX with space between the cards, this unfortunate design aspect may be a deal breaker. Nevertheless, if SilverStone had installed an eighth PCI/PCI-Express bracket in the Fortress FT02 like it did with the Raveon RV02, this issue would not have been relevant.
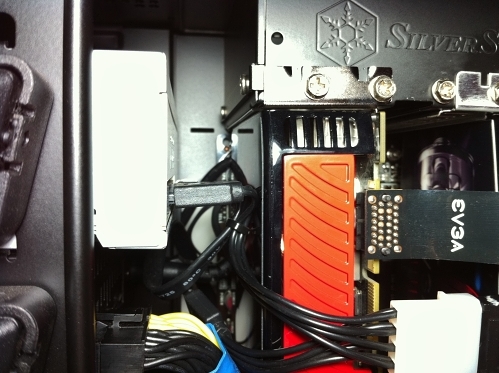
A 5.25-inch DVD drive without enough installation clearance interfering with two-way SLI
On the other hand, we were more than delighted by the ease of hard drive installation on this chassis. SilverStone’s engineering group decided to depart from the metal drive bay design that accompanies the Raven RV02 and continued with the much simpler five-drive plastic bracket system featured on the Fortress FT01 and Raven RV01. Hard drive installation does not require any screws or tools, and the drive brackets conveniently feature rubber rings to sandwich the drives in place while minimizing vibration propagated from the rest of the chassis. As a bonus, the first drive bay contains a hot-swappable SATA II connector for hard drive mobility and troubleshooting purposes. Unfortunately, the hot-swap bracket doesn’t support SAS drives, even though unified serial brackets have similar manufacturing costs on SilverStone’s end.
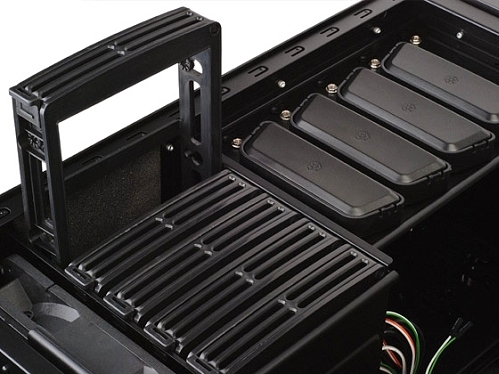
SilverStone Fortress FT02 drive installation bays

In a new design step that we have been anxiously awaiting from a chassis manufacturer, SilverStone has embedded silencing foam into the interior of the Fortress FT02 chassis for acoustic sound dampening purposes. The design win appeals mainly to acoustic diehards and audio professionals, and it allows for effective noise absorption produced by any component within the aluminium body and works conjointly with the U-shaped diaphragm of the interior.
Wire management was also very painless and straightforward when assembling our components in the Fortress FT02. Then again, that may be due in part to our expertise on the subject. SilverStone conveniently placed wiring and cable routing pathways throughout the motherboard tray and frame of the chassis. We were able to maneuver the flexible modular cables of our power supply with relative ease behind small hidden spaces and behind the motherboard tray where they would go unnoticed. However, we should note that it did take a little over ten minutes to strap the power supply into position. With smaller units, it is necessary to ensure that the power supply does not move around when being fastened into place. It took us a bit of juggling to get all the mounting parts installed, but the mounting system appears to be sturdy enough for suitable use. In comparison to installing a large SilverStone Strider ST1500 1500W power supply, our smaller unit took roughly twice as long and required two people to secure it in place.